এই আর্টিকেলে - 1. c# program এর basic structure শিখবো। আমরা এই নিচের program টা example হিসেবে use করবো // Namespace Declaration using System;
class Programs
{ public static void Main()
{ // Write to console Console.WriteLine ("Welcome to C# Tutorial!");
}
}
2. using Systemdeclaration এর purpose কি - using System নামের এই namespace declaration টা indicate করে যে আপনি System নামের namespace টা use করছেন। আপনি যদি using System, declaration টা omit করে দেন তাহলে আপনাকে Console class এর fully qualified name লিখতে হবে।আসলে এই namespace কিছু classes, interfaces, structs, enums এবং delegates এর collection, এবং এই namespace ব্যাবহার করা হয় আপনার code কে organize করার জন্য। আমরা পরবর্তী session গুলোতে namespaces নিয়ে details আলোচনা করবো।
3. Main() method এর purpose কি - এই Main method হল আপনার application এ ঢোঁকার entry point।
এই আর্টিকেলে আমরা entity framework এর code first approach এ stored procedures এর মাধ্যমে কিভাবে Insert, Update এবং Delete operations গুলো perform করতে হয় তা নিয়ে আলোচনা করবো।
এই আর্টিকেলের explanations ভালভাবে বুঝতে নিচের video টি একবার দেখে আসুন। ধন্যবাদ।।
N.B:Practical ধাপগুলো আমি আপনাদের বোঝার সুবিধার জন্য English এ explain করবো। এই step গুলো VS2017(Visual Studio 2017) এ execute করা হয়েছে।
Step 1: Create a new empty asp.net web application project. Name it Demo. Install entity framework if it's not already installed.
Step 2: Add a class file to the project. Name it Employee.cs. Copy and paste the following code.
namespace Demo
{
publicclassEmployee
{
publicint ID { get; set; }
publicstring Name { get; set; }
publicstring Gender { get; set; }
publicint Salary { get; set; }
}
}
Step 3: Add a class file to the project. Name it EmployeeDBContext.cs. Copy and paste the following code.
Step 6: Add a webform to the project. Drag and drop the following 3 controls and build the solution. 1. GridView 2. DetailsView 3. ObjectDataSource
Step 7: Configure ObjectDataSource control a) Right click on the ObjectDataSource control and select "Show Smart Tag" option b) Click on Configure Data Source link c) Select Demo.EmployeeRepository on Choose a Business Object screen and click Next d) On Define Data Methods screen i) On SELECT tab - Select GetEmployees() method ii) On UPDATE tab - Select UpdateEmployees(Employee employee) method iii) On INSERT tab - Select InsertEmployees(Employee employee) method iv) On DELETE tab - Select DeletEmployees(Employee employee) method
Step 8: Configure GridView control a) Right click on GridView control and select "Show Smart Tag" option b) Click on "Auto Format" link and select "Colourful" scheme c) Select "ObjectDataSource1" from "Choose Data Source" dropdownlist d) Select Enable Editing and Enable Deleting checkboxes e) Set DataKeyNames="ID". Do this in the properties window of the GridView control
Step 9: Configure DetailsView control a) Right click on DetailsView control and select "Show Smart Tag" option b) Click on "Auto Format" link and select "Colourful" scheme c) Select "ObjectDataSource1" from "Choose Data Source" dropdownlist d) Select Enable Inserting checkbox e) Set DeafultMode=Insert. Use properties window to set this. f) Set InsertVisible="false" for the ID BoundField. You can do this directly in the HTML Source.
Step 10: If you already have Sample database in SQL Server. Delete it from SQL Server Management Studio.
Step 11: Run the application by pressing CTRL + F5. Notice that we don't have any data displayed on WebForm1. This is because we don't have any data in the Employees table.
At this point, we have the Sample database and Employees table created automatically. The following stored procedures are also automatically generated. Employee_Delete Employee_Insert Employee_Update
By default, the following should be the naming convention for the stored procedures. INSERT stored procedure - [Entity_Name]_Insert. Insert Stored procedure should return the auto-generated identity column value. UPDATE stored procedure - [Entity_Name]_Update DELETE stored procedure - [Entity_Name]_Delete
Step 12: Use the below SQL script to populate Employees tables with test data.
At this point, 1. Run SQL Prrofiler 2. Run the application 3. Insert, Update and Delete Employees, and notice that the respective stored procedures are being called as expected.
নিচের explanations ভালভাবে বুঝতে এই video টি একবার দেখে আসুন। ধন্যবাদ।।
এই আর্টিকেল আমরা Entity framework এ Insert, Update এবং Delete operations গুলো perform করার জন্য কিভাবে আমরা আমাদের own custom stored procedures use করতে পারি সেই বিষয়ে discuss করবো। আমরা demo হিসেবে নিচের Employees table টা ব্যাবহার করবো -
Employees table
N.B:Practical ধাপগুলো আমি আপনাদের বোঝার সুবিধার জন্য English এ explain করবো। এই step গুলো VS2017(Visual Studio 2017) এ execute করা হয়েছে।
Step 1: Use the following SQL Script to create and populate the Employees table.
Update Employees Set Name = @Name, Gender = @Gender,
Salary = @Salary
where ID = @ID
End
Go
Createprocedure DeleteEmployee
@ID int
as
Begin
Deletefrom Employees where ID = @ID
End
Go
Step 3: Create a new empty asp.net web application with Entity Framework (follow part 1)
Step 4: Add a new ADO.NET Entity Data Model. a) On Choose Model Contents screen select "EF Designer from database" option and click Next
Model contents selection
b) On "Choose Your Data Connections" screen give a meaningful name for the connection string that will be stored in the web.config file. I have named it EmployeeDBContext. Click Next.
DBContext Name
c) On "Choose Your Database Objects" screen, select Employees Table and the 3 stored procedures (InsertEmployee, UpdateEmployee, DeleteEmployee). Provide a meaningful name for the Model namespace. I have named it EmployeeModel. Click Finish.
Database Object Settings
At this point on the ADO.NET Entity Model designer surface, we should be able to see the Employee entity but not the stored procedures.
To view the stored procedures, 1. Right click on entity model designer surface and select "Model Browser" from the context menu.
2. Expand Stored Procedures folder
Expand Stored Procedures
Step 5: Add a web form to the project. Drag and drop the following 3 controls and build the solution. 1. GridView 2. DetailsView 3. EntityDataSource
Step 6: Configure EntityDataSource control
a) Right click on EntityDataSource control and select "Show Smart Tag" option
b) Click on Configure Data Source link
c) Select EmployeeDBContext from the Named Connection drop-down list and click Next
d) Select the options on "Configure Data Selection" screen as shown in the image below and click Finish
configure entity data source
Step 7: Configure GridView control
a). Right click on GridView control and select "Show Smart Tag" option
b) Click on "Auto Format" link and select "Colourful" scheme
c) Select "EntityDataSource1" from "Choose Data Source" dropdownlist
d) Select Enable Editing and Enable Deleting checkboxes
GridView Configuration
Step 8: Configure DetailsView control a) Right click on DetailsView control and select "Show Smart Tag" option b) Click on "Auto Format" link and select "Colourful" scheme c) Select "EntityDataSource1" from "Choose Data Source" drop-down list d) Select Enable Inserting checkbox e) Set DeafultMode=Insert. Use properties window to set this. f) Set InsertVisible="false" for the ID BoundField. You can do this directly in the HTML Source. g) Generate ItemInserted event handler method for DetailsView control. Copy and paste the following code.
DetailsViewInsertedEventArgse)
{
GridView1.DataBind();
}
At this point if you run the application, and if you insert, update and delete employees, by default entity framework will use the SQL it auto-generates and not our custom stored procedures.
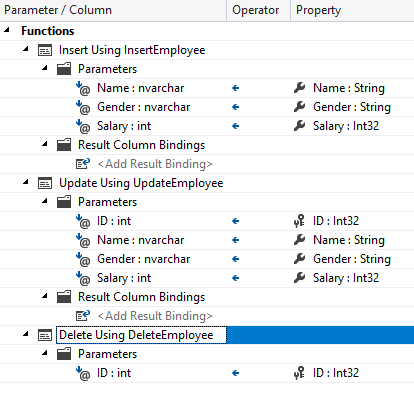
To tell the entity framework to use the stored procedures, we have to map them to the Employee entity.
Here are the steps. 1. Right click on "Employee" entity on "EmployeeModel.edmx" and select "Stored Procedure Mapping" option from the context menu.
2. In the "Mapping Details" windows specify the Insert, Update and Delete stored procedures that you want to use with "Employee" entity
stored procedure mapping in entity framework
At this point, 1. Run SQL Prrofiler 2. Run the application 3. Insert, Update and Delete Employee, and notice that the respective stored procedures are being called now.
এই আর্টিকেল series এ আমরা database কে সব সময়ই manually test data দিয়ে populating করেছি, মানে sql script দিয়ে database এ data insert এর কাজটা করেছি। Entity Framework এই data insert এর কাজটাকেউ automate করতে পারে। আমরা এই পর্বে পার্ট 5 এর example টা নিয়ে কাজ করবো। Here are the steps -
Step 1: project এর solution explorer এ Right click করে একটা class file add করুন,যার name হবে EmployeeDBContextSeeder.cs
Step 2: নিচের code টুকু Copy করে EmployeeDBContextSeeder.cs file এ paste করুন -
Step 4:Employee.cs file থেকে নিচের Table এবং Column attributes remove করে দীন - [Table("tblEmployees")] [Column("First_Name")] এখন Employee class টা দেখতে নিচের মতো হওয়া উচিত
publicclassEmployee
{
publicintId { get; set; }
publicstringFirstName { get; set; }
publicstringLastName { get; set; }
publicstringGender { get; set; }
publicintSalary { get; set; }
publicintDepartmentId { get; set; }
[ForeignKey("DepartmentId")]
publicDepartmentDepartment { get; set; }
publicstringJobTitle { get; set; }
}
Step 5: এখন application টা run করলে দেখবেন যে, Sample database, Departments এবং Employees tables created হয়েছে এবং test data দিয়ে automatically populated হয়েছে। webForm এ নিচের মতো output আসবে-
Output
উপরের explanations আরও ভালভাবে বুঝতে এই video টি একবার দেখে আসুন। ধন্যবাদ।।